
I have been using the Honeywell Evohome system in our house for multi-zone underfloor heating since it’s we’ve moved in. I’ve also been having issues with this system since that time and it’s cost me a lot of work to get it to do what it should do and I’m really fed up with it!
–update 2020-08
I have since also published a video and article about new 4$ sensors!
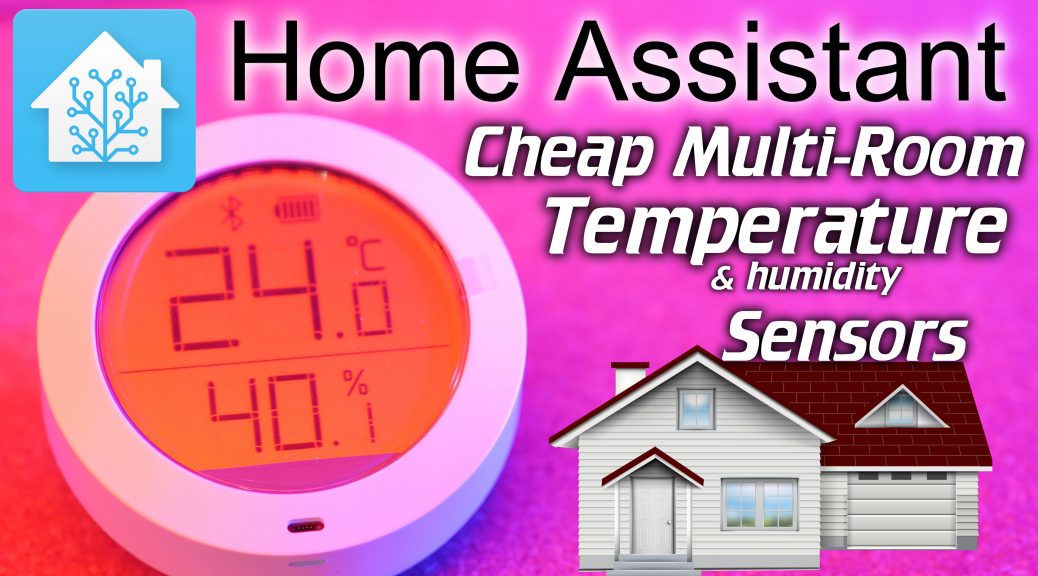
This video is the first step into replacing that system! In this video we’re going to set up an easy to configure and cheap multi-room temperature sensing system with Home Assistant at its heart.
Video about setup
This post is the text portion that accompanies the main part which is in the video, please watch it first, the video refers to this blog post where needed!
Shopping links
During the video I use certain hardware, here is a list of the hardware that I used. These are affiliate links and help me out! 😀
- Xiaomi Mijia Temperature and Humidity sensor: https://geni.us/Tr2RpJH
- New e-ink versions:
- Same round size: https://geni.us/eJIB
- Bigger rectangular model: https://geni.us/JBWKR
- New e-ink versions:
- MH-ET Live ESP32: http://geni.us/4OZdAj
- or Wemos D32 Mini: https://geni.us/9aXV
- Good Micro-USB cable: https://geni.us/4Yqui9t
- Good Phone charger that can deliver 5v 2A (10w) on a single port: https://geni.us/TiSqB
*The power bank charger combo used in the video isn’t for sale anymore it seems
ESPhome
ESPhome is the awesome software used to achieve the Bluetooth -> Home Assistant bridging of the temperature, humidity and battery level data.
It’s an easy way to create firmware that runs on an ESP8266 or ESP32.
Check it out on https://esphome.io !
Text bits
During the video I refer to the following bits:
Scanner configuration:
esphome:
  name: 'vidtemp'
  platform: ESP32
  board: mhetesp32devkit

wifi:
  ssid: 'WIFI SSID'
  password: 'WIFI PASSWORD'

api:

web_server:
  port: 80

logger:

ota:
  password: 'OTA PASSWORD'

# Enable Bluetooth scanning for this ESP32
esp32_ble_tracker:
Remember to change the name to the name you also used in ESPhome and change the WiFi SSID, WiFi PASSWORD and OTA PASSWORD to what you are using in your configuration!
Full configuration:
For the full configuration we only add to the above configuration. So paste the following below what was already there:
sensor:
  - platform: xiaomi_mijia
    mac_address: XX:XX:XX:XX:XX:XX
    temperature:
      name: "Sensor_1 Temperature"
    humidity:
      name: "Sensor_1 Humidity"
    battery_level:
      name: "Sensor_1 Battery Level"

  - platform: xiaomi_mijia
    mac_address: XX:XX:XX:XX:XX:XX
    temperature:
      name: "Sensor_2 Temperature"
    humidity:
      name: "Sensor_2 Humidity"
    battery_level:
      name: "Sensor_2 Battery Level"
Here you will need to replace the XX:XX:XX:XX:XX:XX with the actual MAC addresses of the Xiaomi Mijia meters. In the video I show how to do this using the scanner configuration.
Update: Auto daily reset
–2019-05-26
Since posting this article and video I’ve become aware that the ESP32 still isn’t 100% stable while using bluetooth yet. Although it can run fine for weeks, at some point it might stop receiving bluetooth information.
For this I have added some code to the above example which resets the ESP32 module every 24Hrs, doing this I haven’t had any issues anymore and I have always had my temperature and humidity information!
I’m hopeful these bugs in the ESP32 Bluetooth stack will be fixed in the future but for now this is a workable workaround.
You can add this to your configuration as follows:
time:
  - platform: homeassistant
    on_time:
      - seconds: 0
        minutes: 0
        hours: 4
        days_of_week: MON-SUN
        then:
           - switch.toggle: restart_switch

switch:
  - platform: restart
    name: "test_temperature Restart"
    id: restart_switch
–update 2019-06-08
Changed the name of the switch id because a newer version of ESPhome would error using the “restart”name.
great video I flashed my frist esp32 with this video i have many esp8266 flashed but always struggled with 32 i used the esphomeflasher first time thanks
That’s great to hear! 😀
ESPhome flasher makes it easy to do that first flash and after that you can use OTA so don’t need it anymore, it’s an awesome system like that!
Totally agree
Thanks for the video. I hope to order to some these for my place.
Is there a reason you used ESP home flasher instead of uploading from esphome via the usb port?
Yes, my ESPhome install runs in a docker container in a VM on my Proxmox server, wayyyy to much hassle to get a USB port passed through. My server is also located very inconveniently to access it’s USB ports. ESPhome flaser solves that issue and you can just do it conveniently at your desk! 🙂
Hi,
amazing project, thanks for sharing!
I will definitely try that as I have already one of those sensors.
Can I use any esp 32 based micro controller or it works specifically with those two you mention in the description.
Regards
It should work with all since in theory all ESP32 modules have bluetooth on board.
Good video! What is the distance from ESP32 to sensors? Can I put the ESP32 on the ground floor and the sensors on the second ?
Marius
That really depends on the amount of insulation that is in there. For me that’s a no-go but if you have wooden floors that might work just fine.
Great video, just set 2 of these Xiaomi Mijia sensors up using your informative setup procedure. Thanks, One question I see a 300s scan interval in the logs – is this the bluetooth scan interval of the esp32 or the scan interval of the discovered sensors in the esphome bin file. I want to update home assistant more regularly.
Many thanks.
The 300s is the scan interval for new devices. The devices you configured in the ESPhome configuration will pass an update when the temperature changes (they don’t send anything if the values don’t change). I’ve seen multiple updates per minute so should be fast enough for most purposes.
Thanks, that clears it up. Thanks again for the video, great work.
I’m curious about the minimum battery voltage these devices need to keep working, and if they would work fine with a rechargeable NiMh AAA cell at 1.2 volts. With the discharge slope of an alkaline cell, it spends much of its life below the 1.5 volts that it starts out with, and the cut-off voltage for many devices is supposedly 1 volt. Replacing an alkaline battery once a year isn’t a major financial outlay (well maybe for 18+ of them, it would be), but why create more waste.
Another thing I’ve been wondering about is firmware updates. Being a simple device, it may never need updating, but right now it looks like it would need the Xiaomi bridge and their phone app.
I did a short test with some Eneloops in there and that seemed to work ok. But that test wasn’t longer then a month and the drop off in my graphs was a bit more then with normal Alkaline batteries which is logical because as you said, they start at a lower voltage. So I don’t really know the run-time for that kind of time period yet. The one’s I had duracell’s in for a month ended up between 85% and 95%. I think it mostly depends on how many temperature swings there are since it delivers more messages with changing temperatures then stable. A more thorough analysis will follow later when I’ve been using it for a while. 🙂
Thaks! Great video, it helps me to set up my WeMosESp32 with HA. I wonder if you can provide link for second part of the video. Thanks!
Thanks for the video – really helped to get my way through.
Would recommend to save before the original Firmware with a FlashRead (check esptool.py).
Tonight I programmed my first NodeMCU32! :smiley: with ESPHome!
Got them working as BLE Beacons in combination with Owntracks for quick and reliable presence detection.
Now I really like the Xiaomi Mija Temperature and Humidy sensors which are being used in some recent videos. Do you guys think a combination of BLE xmit and receive will work on 1 NodeMCU ESP32 module.
This would be perfect since I scattered three modules in the house. Good theoretical coverage for the xiaomi Bluetooth temperature sensors.
I just have to put :
esp32_ble_beacon & esp32_ble_tracker
in the ESPhome config, correct?
Hi @Braim1nat0r, I think this can work but I haven’t tried it myself, what have your results been?
Thank you for your inspiring videos which have greatly helped me in taming my Xiaomi sensors. I use them to monitor my 3D printer filaments dryboxes and it is working great, muchg better than the dodgy original App. I have also noticed that from time to time I would loose the temp/hygro reporting while the ESP is still alive. The reboot trick will surely help. I have one question though. How would you enfore such a reboot on an ESP32 which is in deep sleep mode and which resumes 10s every 10 min ? What would be the best way to specify a “non equal time” condition for reboot such as “once you have past this time of the day” do a reboot, but only once a day ?
Poeh, that’s a good question! I don’t know if there is a trigger or a counter you could build within ESPhome to do the reboot. But I also wonder if the reboot is necessary if the ESP32 module goes into deep sleep. The problem while having an active ESP32 is that the bluetooth stack crashes in the backend code of the ESP32, it’s not really fixable in ESPhome because it’s a problem in the backend drivers. But if you module goes into deep sleep, I wonder if this stack wouldn’t be restarted anyway.
Thanks for introducing me to these sensors. Like you, I’ve ended up here due to an unreliable heating system and a desire to automate it without relying on external systems. I’ll end up with 11 sensors which will drive my home’s underfloor heating and I’m in the early stages of developing the automation.
I’m currently testing 2 of the Xiaomi sensors talking to a LOLIN D32 board. As you’ve found, the readings can stop being taken from one or more of the sensors after a certain amount of time. I used your script that triggered a daily reset, but I was still occasionally seeing the readings stop.
I’ve now set up a watchdog in Node-RED that calls the reset service if no temperature readings have been received for 60 minutes. I’ll see how this works…
I notice that the latest release of ESPHome (1.13.5) has a workaround for ESP32 BLE issue #626 – https://github.com/esphome/esphome/pull/626
I’m not sure if this applies to the problems we’ve seen, but I’ll keep my fingers crossed.
I look forward to the next update on your project.
Hi, thnx for your awesome comment! I hope to be able to continue with this project soon, but lots of stuff going on so it might take a little bit. I also noticed the ESPhome issue where they implemented a workaround if the BLE scan never finishes, if that works correctly that would be even better then the “once a day” I implemented. I’ll be testing it and will probably talk about it when I get a chance to do a new video about this topic! 😀
Mine has been running now for over a week without getting stuck, so I guess the fix in the recent release can be considered successful.
I spoke too soon, mine lost contact and had to be reset to communicate with the devices. It’s certainly better than before, though.
chrismox how do you do the watchdog in node-red. I was hoping to sense if my car was in the garage by having a Xiaomi Temp sensor in the car. I’m new to Node-red, but have some basic automations.
Oh that can work I think, it will start updating again once it’s in range and if you link an action to that, that could work?
I use node-red-contrib-timeout – https://flows.nodered.org/node/node-red-contrib-timeout
Node-RED receives the thermostat temperature readings from Home Assistant. When a reading is sent from HA, Node-RED sends the reading to a node-red-contrib-timeout node.
Every time a temperature reading is received, the timeout timer is reset. Therefore, if no reading is received for a certain amount of time (mine’s set to 1 hour), the timeout node then calls the HA service to reboot the ESP32 which is failing to take readings.
I’ve subsequently worked out that when readings are not received by the ESP32, it’s nothing to do with the device getting stuck/frozen. The ESP32 needs to be fairly close to each of the thermostats it’s taking readings from, or sometimes it struggles and gets nothing for a while. When mine are suitably nearby, my watchdog never gets triggered and all is well.
Hey, that’s an interesting way to deal with the bluetooth stopping on the ESP32 although I believe ESPhome also has a built-in watchdog now which resets or restarts the bluetooth part if it appears to be hanging. Still, very interesting solution!
could you share your flow for the reset?
I wonder, do you need to calibrate the temperature and humidity sensor? THNX
Nope, the Xiaomi come well calibrated out of the box!
i add under the wifi settings:
wifi:
ssid: ‘ESP32’
password: ‘*******’
power_save_mode: none
This seems to work for me.
had a lot of trouble that I had no connection
Really like your projects and viedos, thanks for sharing!!!
Recently I have built this Bluetooth sensor solution because it is the ideal solution for a requirement I have.
It all works perfectly as long as the sensor and ESP32 module are close to each other. A wall or even a simple window breaks the connection. Even a few meters distance without any obstacle interrupts the connection…
Now I guess I have a lazy ESP32 module or is the Xioami sensor just so weak?
Has anyone experienced Bluetooth ranges from different ESP32 modules? I guess very much it is due to the ESP module…
Any help is welcome!
By the way, greetings to the Netherlands!
I really appreciate your videos. They are clear and easy to understand. I purchased four of the Xiaomi Mijia Temperature and Humidity sensors and the MH-ET Live. When I connect the MH-ET to Espflasher (ESPHome-Flasher-1.1.0-windows-x64), the program is not showing any ports to flash in the Serial Port drop down. It is connected to my Windows 10 USB port. I have also tried on a Mac with the same results. Is this me doing something wrong or this particular chip? The red led lights up when I plug it in.
You advice would be appreciated.
Do you see a serial port or maybe a device without a driver in Windows Device Manager? It needs to show up there first before it can work.
Hi, I had the same situation. Lack of drivers. I had installed CP210x_Windows drivers for ESP32 from http://www.silabs.com page and it helped.
Great work. You helped me create my first ESPHOME sensor
Great guide! I managed to use my ESP32 board and capture BLE packets.
I am wondering, could we use an ESP32-CAM board and use it as a camera/BLE packets capture board simultaneously?
There is a change with the new ESPhome release 1.14.x :
The xiaomi_ BLE platforms have been renamed to match their model numbers (esphome#755).
xiaomi_mijia -> xiaomi_lywsdcgq
xiaomi_miflora -> xiaomi_hhccjcy01
so you have to use:
– platform: xiaomi_lywsdcgq
regards,
Pino
What about the newest version of the Mijia sensor LYWSD03MMC ?
Does it work with HA and ESPHome?
@Mike, did you try the LYWSD03MMC ?
Hi, take a look at the documentation of the custom “Xiaomi passive BLE monitor sensor platform” integration for Home Assistant. This integration can be done easily with HACS and is better than the official “mitemp_bt” Home Assistant integration.
https://github.com/custom-components/sensor.mitemp_bt
It says this :
“LYWSD03MMC
(small square body, segment LCD, broadcasts temperature and humidity once in about 10 minutes and battery once in an hour, advertisements are encrypted, therefore you need to set the key in your configuration, see for instructions the encryptors option.”
Since the ESPHome ESP32 listens passively bluetooth uncrypted messages from the temperature sensors (and do not affect battery life negatively), i don’t think we will see the LYWSD03MMC supported soon because you need to get the encryption key. The only way to get it working with HA is with the custom integration mentioned above.
Personally i managed to get the encryption key with this russian custom Mi Home App by vevs (https://www.kapiba.ru/2017/11/mi-home.html#more), translate the page to help you know where to click to download the app. I am not sure if you need a rooted android device but here is what you need to do :
1) download the app, copy it on your android device and install it
2) create a folder /vevs/logs on you device
3) start the app and pair the LYWSD03MMC (if already paired, unpair it and pair it again)
4) open the “pairings.txt” located into the logs folder
5) search for “Bindkey”, this is your 32 characters key that you need
Note : this app is extremely useful because it creates a lot of .txt files and the “devices.txt” file created in the logs folder gives you the TOKEN for each device added into the app. 🙂
Hi, see the documentation of the custom “Xiaomi passive BLE monitor sensor platform” integration for Home Assistant. This integration can be done easily with HACS and is better than the official “mitemp_bt” Home Assistant integration.
https://github.com/custom-components/sensor.mitemp_bt
It says this :
“LYWSD03MMC
(small square body, segment LCD, broadcasts temperature and humidity once in about 10 minutes and battery once in an hour, advertisements are encrypted, therefore you need to set the key in your configuration, see for instructions the encryptors option.”
Since the ESPHome ESP32 listens passively bluetooth uncrypted messages from the temperature sensors (and do not affect battery life negatively), i don’t think we will see the LYWSD03MMC supported soon because you need to get the encryption key. The only way to get it working with HA is with the custom integration mentioned above.
Personally i managed to get the encryption key with this russian custom Mi Home App by vevs (https://www.kapiba.ru/2017/11/mi-home.html#more), translate the page to help you know where to click to download the app. I am not sure if you need a rooted android device but here is what you need to do :
1) download the app, copy it on your android device and install it
2) create a folder /vevs/logs on you device
3) start the app and pair the LYWSD03MMC (if already paired, unpair it and pair it again)
4) open the “pairings.txt” located into the logs folder
5) search for “Bindkey”, this is your 32 characters key that you need
Note : this app is extremely useful because it creates a lot of .txt files and the “devices.txt” file created in the logs folder gives you the TOKEN for each device added into the app. 🙂
You can also add these lines in the yaml file to get a sensor of the WiFi signal and uptime:
#Hub
– platform: wifi_signal
name: tempsensorhub1_wifi_signal
update_interval: 10s
– platform: uptime
name: tempsensorhub1_uptime
Wonderful video! While mimicking what you presented I had 3 sensors operational within 2 hours. I am simply stunned by the easiness of the process. Had to look up the correct platform type of the sensors on the esphome site, needed to specify
sensor:
– platform: xiaomi_lywsdcgq
When at that site I also found directions how to connect with my hidden domotica wifi network
Many thanks for sharing your knowledge with the world!
Thanks for the code to restart daily.
I knew this was possible, and is mentioned on HA forums, ESPhome github repo etc, but no one else posted the full solution with the switch AND timer 🙂
Hi everyone, i have 4 temperature & humidity sensor types from Xiaomi/ClearGrass.
1) I have the one that is mentioned in this article
2) a round one (e-ink display) from ClearGrass
3) a rectangular temperature&humidity / clock sensor (e-ink display) from Xiaomi
4) and a small square temperature&humidity sensor from Xiaomi (this one is not compatible with ESPHome but we can still make it work with Home Assistant)
CHECK this Google Sheet that i made which compares these sensors and tells which one is good for what.
https://docs.google.com/spreadsheets/d/10qnYSn58TGHo94be__34PY7KUozqwq5Pr8S1KMtKvWY/edit?usp=sharing
Hi Quindor,
Thanks for the great video and content. Was wondering if you know of a device that also adds co2 and or other air quality related items? If I would hang these devices in all rooms it would be nice to also be able to measure overall air quality.
Thanks, Alex
Anybody else having the issue that the ESP32 loses it’s wifi connection? Sometimes it takes over a day for it to lose the wifi connection other times the wifi connection is lost within an hour.
The ESP is connected to wifi on a fritzbox and has a decent signal strength of about -52dB
Odd, I personally do not have this issue at least, I have some which are connected for weeks without fail. Using a Mikrotik system myself.
I updated the ESP32 config in the following way and it has been working for 3 days straight now (with a daily restart as in your update from 2019-05-26):
wifi:
ssid: “”
password: “”
power_save_mode: light
fast_connect: true
manual_ip:
static_ip: 192.168.1.15
gateway: 192.168.1.1
subnet: 255.255.255.0
Yes, I’m having that same issue.
I love you!
After fiddling around with DHT’s, and the same issues that you’ve found (calibrating, etc), I ran into your video. Due to the fact, that your advices and tips, are rock solid, I bought a complete set of 4 square and 4 round sensors, and 2 of the ESP32 boards. (Lots of concrete in my house). Didn’t took me too long to flash the boards, because that is something I’ve done before. Getting the MAC addresses wasn’t hard too. But then the stuff started…. Very very unstable readings from the ESP32 boards. And also, very unreliable updates from the sensors. On top of that, the firmware upgrade for the square sensors….. But, got everything working. Then I started to notice that the ESP32 boards started to restart randomly. Hence the improper updates, and “holes” in the graphs. Figured out, that the boards get pretty warm, and when a cooling block is attached, they get way more stable. Have now most of them running, pretty stable.
Your code base is superb, and explanation in the video is great, so I want to thank you! Was good for another couple of days “corona-fiddling-with-stuff”
Hey awesome stuff! I’m really confused about the boards getting warm though, I run lots of ESP32 modules and none of them really get very warm? I mean I can feel them being a bit warm to the touch, but that’s it? It would be interesting to get a USB power meter on there to see how warm they are getting. I at least haven’t had any such stability issues, ESPhome (and underlying Espressif) bluetooth code used to be a bit unstable but with the newest releases it’s been very good for me!
@ quindor@quindorian.org
Awesome video and tutorial! Thanks!
Quick question have an existing ESP32 running an Alexa to 433MHz gateway for control of motorized blinds. How can I add the ESP Home BLE to WiFi Gateway code to my existing ESP32 firmware? I’m new to the ESP32 world but its a great little device! Thanks & keep up the good work!
Hello.
Anyone knows if it’s possible to add one decimal to humidity?
How about a video tutorial using these esp32s doing double duty as a BLE presence sense detector.
Hello, nice work.
I have at the moment 8 sensors in my house installed. I have an Rasp Pi with a Blutooth Dongel and HA.io installed. But with that I didn`t get all sensors. So I tried it with thr ESP32s.
It works, but the ESP32s only found 1 sensor. It is the sensor directly in the room. Aprox 1,5m distance. I don`t want to use for each sensor a seperate ESP32. So it looks like, that the range from the ESP32 ist very bad. My walls are wood. How many ESP32 have you, how many sensors and how far is the range between it. Thanks.
I have a fairly large house with stone walls, but I only need 3 ESP32s to cover my whole house? Some are 6m to 8m away even? Maybe you got a bad ESP32?
Hi,
at the start off your video you are talking about you made the multi room heating/cooling system yourself. Now I can find the video’s about how to get the temperature per room in HA and how to control relays but not the part that tells me how you controled the rest of the heating system? Did you do the control in HA? What if it breaks down, do you have a backup system? I made 14 relays controlled by a arduino mega wifi board with MQTT but i’m searching for a better way. Can you share more of your system?
I actually never progressed to that stage yet, the current system kind of works (takes manually reprogramming everything twice a year) so I kind of got stuck there. At some point I’ll likely proceed with it but I don’t know when that’s going to be.