Having written the previous article on how to do this with FFMPEG I have become painfully aware of the limitations FFMPEG posses in the RTSP department. I was unable to reliably get a non-corrupted output from it. Thus I looked onward for another tool to do this for me, I ended up with VLC and I wrote a new script for it.

It turns out there is probably only one open-source RTSP stack that is capable of working reliably with MegaPixel IP camera’s. It’s from LIVE555 and often referred to as OpenRTSP. This code is also integrated into VLC to do it’s RTSP stream handling. A formula for success!
This method is not ‘sensitive’ as the FFMPEG script was. System load does not influence if corrupted images are captured or not. So this will now become my preferred method. CPU usage on a Core i5 Quad-Core is around 7% – 8% for my 5Mpix camera. For my 2Mpix camera it’s anywhere from 1% – 3%.
VLC Script:
This script is mostly the same as in the previous FFMPEG version. It uses wmic to generate a date_time variable with which the directories will be created. Then VLC will be called to run for 12 hours.
The 12 hours and seperate folders are there for multiple reasons:
- Not overloading the filesystem in regard to number of files per directory
- Crash or restart survivability basically adding a ‘resume’ function
:begin
@ECHO OFF
ECHO.
SETLOCAL ENABLEDELAYEDEXPANSION
:: Use WMIC to retrieve date and time
FOR /F “skip=1 tokens=1-6” %%A IN (‘WMIC Path Win32_LocalTime Get Day^,Hour^,Minute^,Month^,Second^,Year /Format:table’) DO (
IF NOT “%%~F”==”” (
SET /A SortDate = 10000 * %%F + 100 * %%D + %%A
SET /A SortTime = 10000 * %%B + 100 * %%C
SET SortTime=0000000!SortTime!
SET SortTime=!SortTime:~-6!
)
)
:: Display the results:
set now=%SortDate%_%SortTime%
set now=%now%
echo %now%
:: Proceed with RTSP capture
mkdir d:TimeLapseoutput5Mpix%now%
c:progra~1VideoLANVLCvlc.exe rtsp://172.24.8.10/mpeg4 –video-filter=scene –scene-prefix=img- –scene-format=jpg –scene-path=d:TimeLapseOutput5Mpix%now% –scene-ratio 120 –sout-x264-lookahead=10 –sout-x264-tune=stillimage –vout=dummy –dummy-quiet –run-time 43200 vlc://quit
ENDLOCAL
goto begin
Please change your paths accordingly. Currently the script is set to take an image every ~6 seconds, this can be altered to fit your own needs. I am using the x64 build of VLC for Windows. The script will pop-up the actual VLC window but it will now show any realtime video to save on CPU power. The window will close automatically when it’s done and a new one will pop-up when the script continues.
VLC Settings:
Some settings need to be changed in VLC to get the best quality and lowest CPU usage. I don’t really know if enabling GPU decoding is actually doing anything, but it isn’t hurting it either. I will do more testing later.
The Default VLC Screen
Choose Preferences
Select “GPU accelerated decoding”, click save
(If your GPU does not support decoding your camera stream, do NOT select this)
Change the “Fixed Quantizer scale” to 0,50. This selects the best possible JPG output VLC is currently capable of. Click save again
The GPU acceleration will depend on your hardware (Both PC running it and Camera). I have done some tests using my 2Mpix IPScam’s and my 5Mpix camera. The results are as following, the systems will be listed in order of hardware performance:
Intel Core 2 Duo T7500 @ 2.2Ghz (Mobile)
Nvidia 8600GT
Windows 8
Without GPU Acceleration
2Mpix CPU Usage 10% – 14%
5Mpix CPU Usage 28% – 34%
With GPU Acceleration
2Mpix CPU Usage 2% – 4%
5Mpix CPU Usage 28% – 34%
Remark: The NVidia 8600M GT only seems capable of accelerating the 2Mpix stream. GPU usage is not visible but an increase of 40MB GPU memory + a temperature rise is observed.
Intel Core i7-3612QM (Mobile)
Intel HD4000
Windows 8
Without GPU Acceleration
2Mpix CPU Usage 1% – 2%
5Mpix CPU Usage 6% – 8%
With GPU Acceleration
2Mpix CPU Usage 0% – 1%
5Mpix CPU Usage 3% – 5%
Remark: The Intel HD4000 seems capable of accelerating both video streams. GPU load isn’t observable.
Intel Core i5-2310
NVidia GT630 (Fermi based)
Windows Server 2012
Without GPU Acceleration
2Mpix CPU Usage 2% – 3%
5Mpix CPU Usage 8% – 9%
With GPU Acceleration
2Mpix CPU Usage 0% – 1%
5Mpix CPU Usage 8% – 9%
Remark: The GT630 seems capable of accelerating the 2Mpix stream but not the 5Mpix stream. This card is Fermi based and not Keplar based. Both my Keplar based cards are able to make use of hardware acceleration. The GPU Video Engine Load for the 2Mpix stream was 20%.
Intel Core i7-920 @ 4.0Ghz
NVidia GTX680 (Keplar based)
Windows 8
Without GPU Acceleration
2Mpix CPU Usage 2% – 3%
5Mpix CPU Usage 6% – 8%
With GPU Acceleration
2Mpix CPU Usage 0% – 1%
5Mpix CPU Usage 1% – 2%
Remark: The GTX680 is capable of accelerating both streams with almost no CPU load as a result. The GPU Engine load was 12% for 2Mpix and 17% for 5Mpix. Combined it was around 30%.
General conclusion:
If you wish to enable hardware decoding for a 2Mpix stream most cards can handle this to some degree. But if you wish to do so for a 5Mpix stream (anything above 2Mpix I assume) you will need a GPU capable of 4K Hardware Decoding.
With NVidia that means Fifth Generation PureVideo HD which introduces 4K decode support. These where introduced in the beginning of 2011. Please use the following chart to select one: http://en.wikipedia.org/wiki/Nvidia_PureVideo.
For Intel you will need a Integrated Graphics ‘card’ of the newest Ivy Bridge generation. This generation introduces 4K decode support.
I do not have any knowledge of ATI cards.
Renaming and copying files and removing corrupt files:
Since we now have multiple directories of files from which we wish to create a single timelapse we will have to follow a few manual steps first.
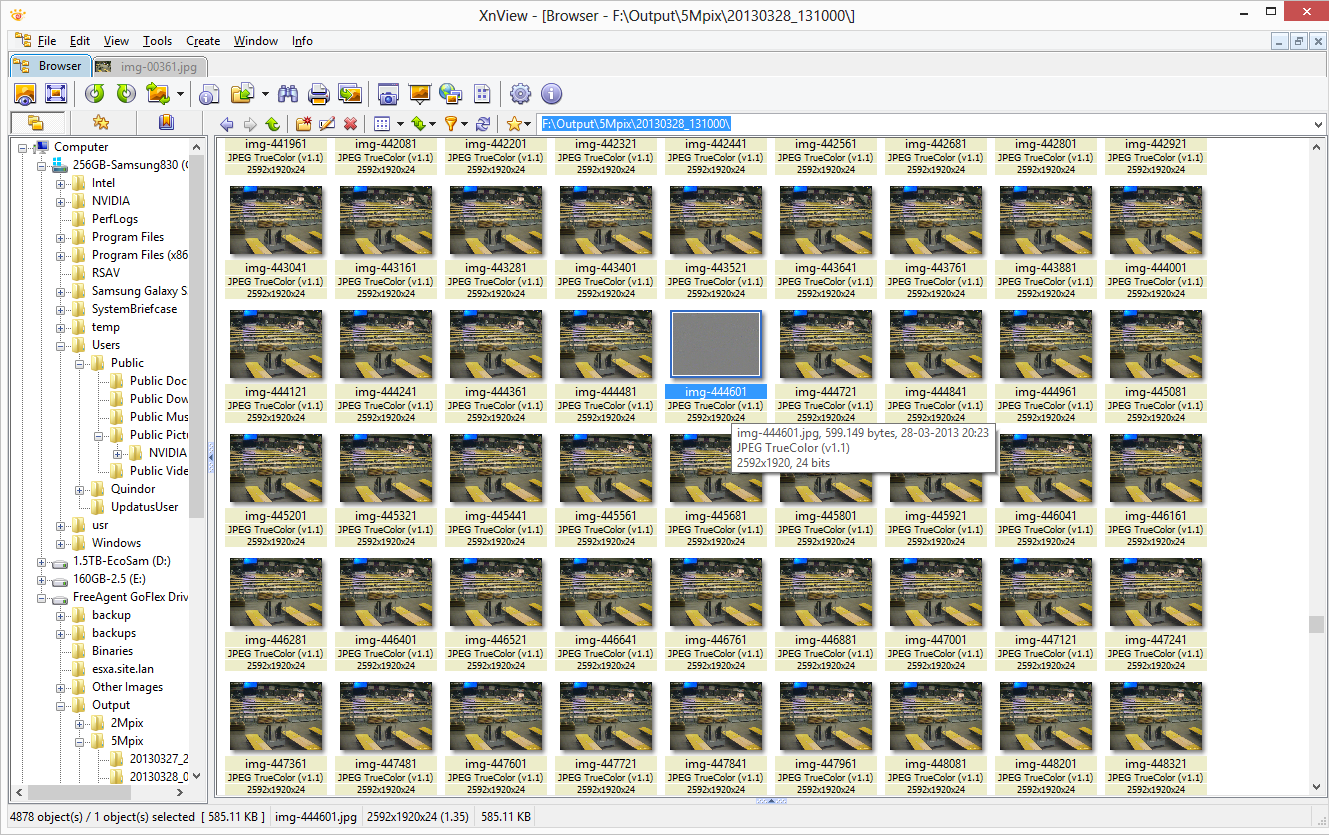
Step1: Download and install a utility called “xnview“. Using this tool open every directory and wait for it to finish generating thumbnails. Then proceed deleting the first 3 images of each directory (with my camera they are always corrupt) and then scrolling through all the images in search for ‘gray’ images. For me with 50.000 files there where about 40 corrupt files which had to be removed.
Remove the first 3 corrupted files and any ‘gray’ files you might encounter
Removing another ‘gray’ file
Renaming the files for FFmpeg input
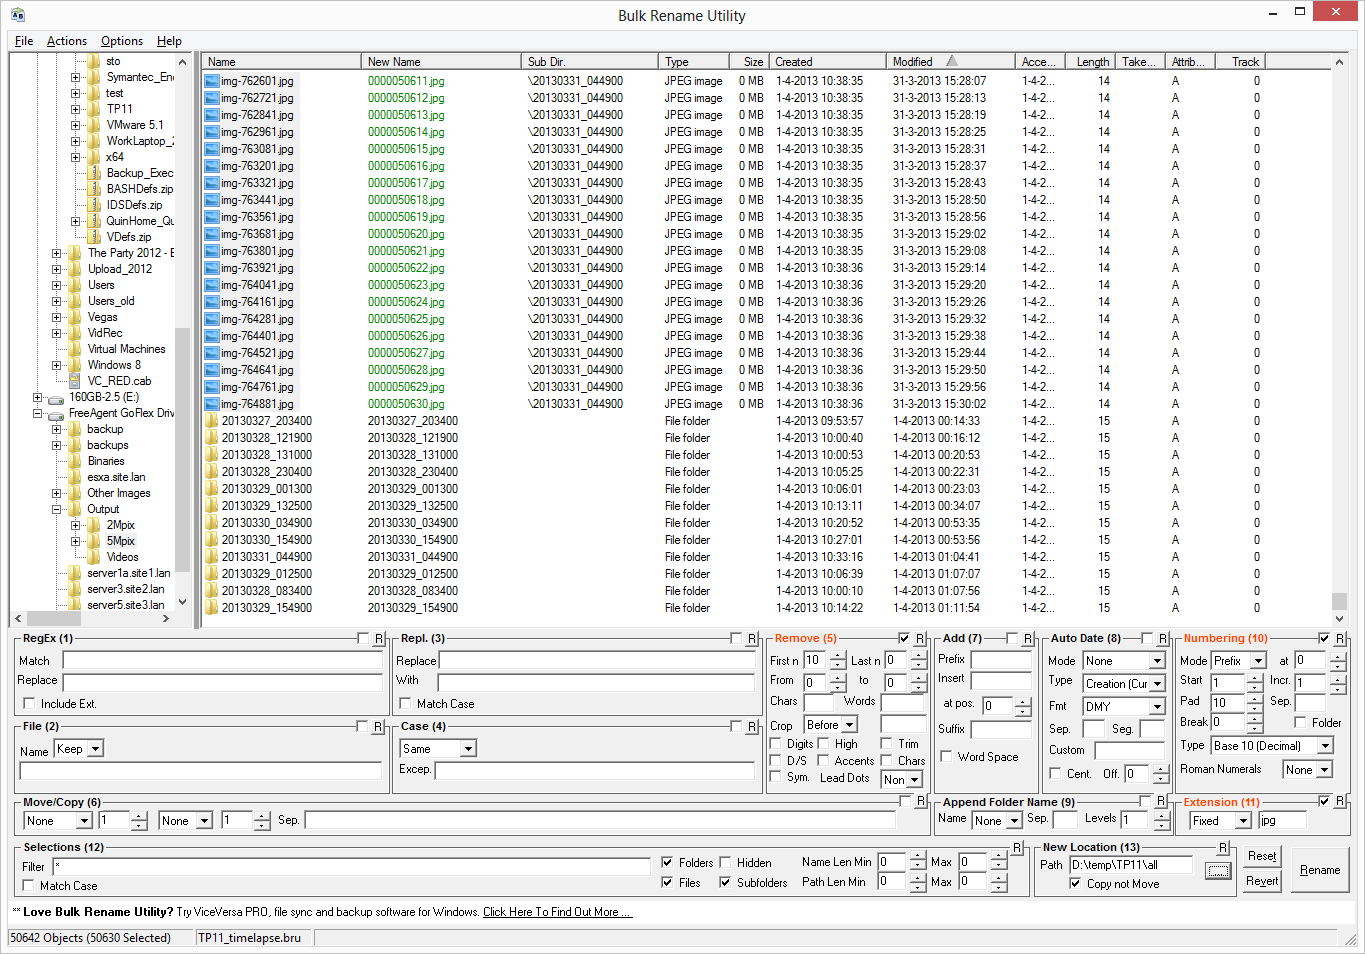
Step 2: Use a utility called “Bulk Rename Tool” to rename all the files of all the subdirectories to a new unified directory where all the files will be gathered so that FFMPEG can process them. This step takes care of renaming the files in each directory and also merging/moving/copying them to a single directory for processing.
Please take a careful look at the settings below. Basically we are stripping their previous name and sorted on “modified date” we are using a 10 pad numbering system.
Settings for bulk rename
Creating the Final TimeLapse Movie:
After removing the corrupt or unwanted images and renaming+merging them into a single directory is done you can use the following script to have FFMPEG create an MPEG4 movie from it. The settings below are for a overly high quality movie so that you can use the footage in an editing program and re-compress it if you wish.
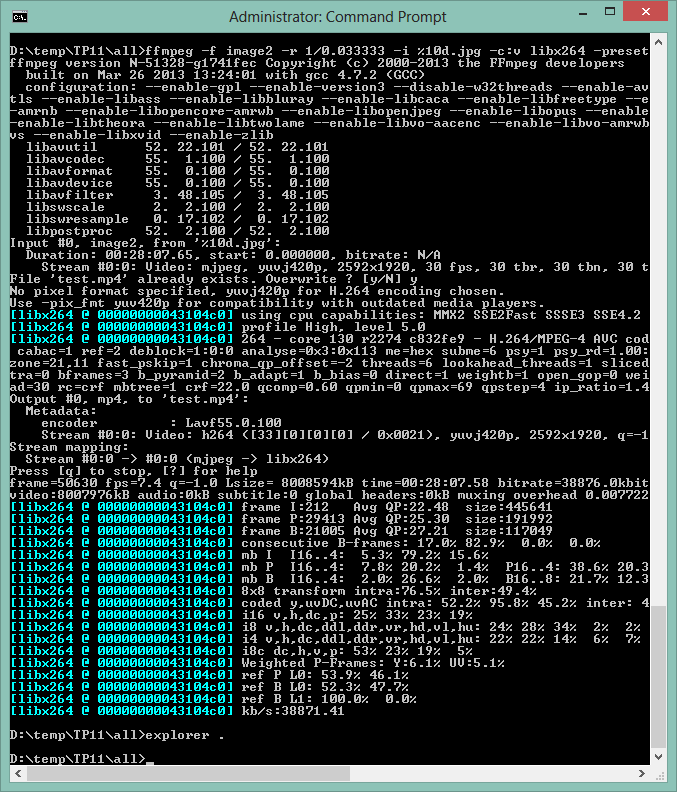
First copy ffmpeg.exe into the directory where the files are located and then execute the following command:
ffmpeg -f image2 -r 1/0.033333 -i %10d.jpg -c:v libx264 -preset fast -crf 20 -framerate 30 output.mp4
FFMPEG done, it can take a while depending on settings and CPU power
You can vary the framerate depending on your wishes. Please remember that popular video websites such as youtube do not support 60FPS. If you wish to have the ability to play youtube movies faster then their original framerate, please switch to the HTML5 client version. If everything went correctly you will end up with a result similar to the following I made last week:
Be sure to select ‘Original’ quality if you have a screen that goes above 1920×1080.
All done!
Below you can find the way I was using before writing the above, easier guide.
OLD Deprecated way
Joining JPG files into MP4’s:
To join the JPG files into a movie we will be using the same FFMPEG line as in the previous script. As said above, it seems only the RTSP implementation of FFMPEG is broken, not the rest!
ffmpeg -f image2 -r 1/0.03 -i d:TimeLapseOutput5Mpix??date??5Mpix%08d.jpg -c:v libx264 -preset slow -crf 18 -framerate 30 d:TimeLapseOutputVideo5Mpix001.mp4
This is still a manual operation. I might write a script for it in the future. For now I advise creating a batch, copying this command and filling in the directory there. Then you can start it and leave it alone for a few hours, depending on how much there is. For 12 Hours of output my Quad-Core i5 took about 1 Hour to process.
This is the only step where you can choose the final quality of the video. Using these settings the output should be almost lossless, but the file will be quite big, definitely not suitable for on the WEB. By raising the “-crf 18” variable to a higher value, quality will decrease but also filesize will decrease.
Joining MP4 files:
I tried to do this using FFMPEG but was unable to get it working correctly. I then looked for another tool to use and ended up with AviDemux. This tool did the job clean and simple without transcoding or anything. This is much preferred over having to do compression over compression.
Screenshots how to merge 4 MP4 files as one continues file:
Opening window of Avidemux
Select “MP4v2 Muxer”
Select “Open”
Select the First MP4 files of the range you wish to join
Select “Append”
Select the next file you wish to merge. Keep doing the last two steps until you have selected all the files you wish to join
When done selecting all the files select “Save”
Choose a filename
Since there is no trans-coding it should be done pretty fast!
And that should be it, you now have a timelapsed video!
Questions or comments are welcome below. 🙂


Hey Quindor
I found your post very helpful. I would like to use this batch to run a long term still capture from numerous IP cameras I have at 5 minute intervals on an ongoing process.
I am not that familiar with batch programming (mainly SQL and LabVIEW), would you be able to help me figure out:
1. How to set the time interval to be every 5 minutes
2. how to save the filename as datestamp? Similar to what you did for the folder name.
I have tried using variations of
–sout=#std{access=file,mux=raw,dst="c:TimeLapseOutput5Mpix%%H-%%M-%%S-RSMorning.jpeg"}
(which I found on another website) within the VLC part of the code, but it doesn't seem to work
Thanks
I simply noticed your last reply to my comment; I even have sent a reply with attachment; however not 100% sure it'll get through. I don’t see any choice to attach files here within the comments.
graphics card
I am also wondering about setting the interval. I have tried different numbers in the script and nothing changed.
[–scene-ratio 120]
Recording ratio is the frame interval after which an automatic screenshot is taken. For a 30 frame per second (fps) video, entering 300 as Recording ratio would take a screenshot every 10 seconds and 1500 would make it 50 seconds.
THANK YOU QUINDOR , for that BEST script !
Sorry for this dumb question: but what kind of scritp-language is this?
Thank you!
Ah, that’s just a Windows batch file
Thank you so much for this. I knew there had to be an easier way to do this with RTSP(and I don’t trust the cheap Wyze cams for the easiest/cheapest solution). Honestly it’s almost 2021 and I just want a time lapse captured over a couple months with at least a few stills/day taken at regular intervals. Preferably a solution that will allow me to get stills with IR night vision too. I have a home server running 24/7 anyway that can easily handle this load. I knew there was no reason the equipment & freeware I already had couldn’t accomplish this task…. but it’s honestly been a b*tch. So thanks again for keeping this up! Take care.
Thanks QUINDOR !
thank you for a flawless and great script.
for those who wonder how to reduce/change the time during which snapshots are taken or how many snapshots will be taken for time when vlc staying opened:
–scene-ratio=120 (120=6sec. , 240=12sec. …etc…)
–run-time=43200 (43200sec.=12h …before close vlc)
I hope this little explanation is helpful.