A guide to iperf (network metering)

Both for my work and private tinkering I often have the need to do bandwith tests over a network connection. Sometimes it’s troubleshooting ethernet connections up to 10Gbit, sometimes it’s testing an internet line, a WiFi link or actual real-world VPN throughput potential. Whatever the case I often need a good mutli-platform bandwith testing tool.

For this I use a program called “iperf” and while it can be a bit daunting at first with a little know-how it’s actually pretty easy! Read on to find out how to use it in a variety of situations: 

A perfect Gigabit connection
  

Iperf is an open-source tool. This has the awesome benefit that it’s available on lots of different operating systems and even CPU architectures. That means you can use your ARM based smartphone/tablet to connect to your Linux Intel based server or to a common windows PC. All combinations are possible making it a very versatile tool. Ubiquiti access-points even have a version built-in!

Iperf consists of one executable which can run in both “client” or “server” mode. Both allow options to be specified to direct what you wish to have tested.
 
The server part is most often the easiest because most differentiating settings are done on the client. Every scenario you wish to test requires a different set of options, so it all depends on what you wish to achieve.
 
I will also try and comment about the amount of speed that you ‘should’ be reaching in a given situation. Testing something is only ever useful if you know what you are testing and understand and are able to interpret the results you are getting and what you should be achieving.
 

Downloading Iperf

Ubuntu/Debian based Linux

On a Debian/Ubuntu based operating system it’s quite easy to install iperf, you simple perform a “sudo apt-get install iperf” and it should be automatically installed! The tool itself is about 250KB.
 

Red Hat based Linux

As with the Debian based linux distributions you can install it using the operating system’s included software tools. For a Red Hat based systems it seems you need to add a repo using “yum –enablerepo=epel -y” and then you can use “yum install iperf”.
 

Windows based OS

For windows, it’s a little bit harder to install iperf since windows does not have a centralized open-source software install system. The easiest way to download it is by using a pre-compiled version. I most often use the version which is available from http://www.iperf.fr. To directly download the current Windows version, click here.
 

Android

For android it’s a little bit harder to get a good working version of iperf. There are several versions available from the market and in the past I have also been able to find a pre-compiled version online which I managed to get working.
 
Most often I use “iPerf for Android”. Sadly enough this version does not honor some switches correctly thus it limits it’s effectiveness as a total testing tool
 
Next to the above version I use “Aruba Utilities” which as an iperf based test built in. To my knowledge this is the best working version of iperf currently available on Android. There are some CLI versions available but they don’t work completely correct.


Single connection bandwith test

Server side

On the server we run:
iperf -s -w 1MB
  • -s    enable the server side
  • -w    TCP Window size, most often the default is 64KB which is a bit small to test actual bandwith, especially on high bandwith connections. I have found 1MB to be a good size to try and saturate links.
This should result in the following being displayed:
C:Temp>iperf -s -w 1MB
————————————————————
Server listening on TCP port 5001
TCP window size: 1.00 MByte
————————————————————

Client side

On the client we run:

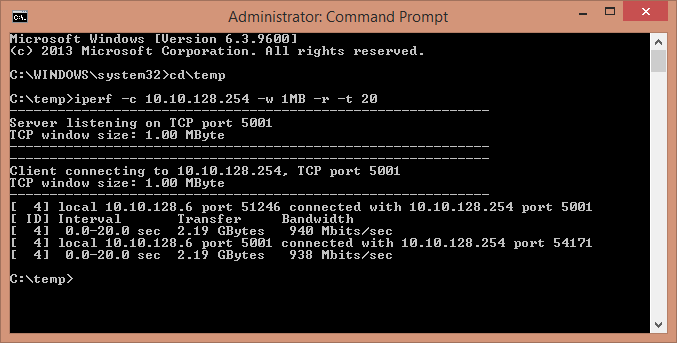
iperf -c 10.10.128.254 -w 1MB -r -t 20

  • -c 10.10.128.254    specifies that you wish to run in client mode and want to connect to IP/DNS name of said server
  • -w 1MB    Again the TCP Window size the client should use
  • -r    Do a sequential bi-directional test. This instructs iperf to test traffic both ways, in 2 tests not running at the same time
  • -t 20    Instructs each test to last 20 seconds
C:temp>iperf -c 10.10.128.254 -w 1MB -r -t 20
————————————————————
Server listening on TCP port 5001
TCP window size: 1.00 MByte
————————————————————
————————————————————
Client connecting to 10.10.128.254, TCP port 5001
TCP window size: 1.00 MByte
————————————————————
[  4] local 10.10.128.6 port 61709 connected with 10.10.128.254 port 5001
[ ID] Interval       Transfer     Bandwidth
[  4]  0.0-20.0 sec  2.19 GBytes   942 Mbits/sec
[  4] local 10.10.128.6 port 5001 connected with 10.10.128.254 port 41609
[  4]  0.0-20.0 sec  2.19 GBytes   938 Mbits/sec


Multiple connection bandwith test

Sometimes a link cannot be fully utilized by only using a single connection. Also firewalls, NAT or some other techniques can have different results with 1 stream or multiple streams. Often using multiple streams puts more pressure on the devices within the 2 computers and gets you a higher result.
 

Server side

On the server we run:
iperf -s -w 1MB
  • -s    enable the server side
  • -w    TCP Window size, most often the default is 64KB which is a bit small to test actual bandwith, especially on high bandwith connections. I have found 1MB to be a good size to try and saturate links.
This should result in the following being displayed:
C:Temp>iperf -s -w 1MB
————————————————————
Server listening on TCP port 5001
TCP window size: 1.00 MByte
————————————————————

Client side

On the client we run:

iperf -c 10.10.128.254 -w 1MB -r -t 20 -P 10

  • Using the same options as above we add
  • -P 10      Creates 10 parallel streams
C:temp>iperf -c 10.10.128.254 -w 1MB -r -t 20 -P 10
————————————————————
Server listening on TCP port 5001
TCP window size: 1.00 MByte
————————————————————
————————————————————
Client connecting to 10.10.128.254, TCP port 5001
TCP window size: 1.00 MByte
————————————————————
[ 13] local 10.10.128.6 port 61817 connected with 10.10.128.254 port 5001
[ 11] local 10.10.128.6 port 61815 connected with 10.10.128.254 port 5001
[  8] local 10.10.128.6 port 61813 connected with 10.10.128.254 port 5001
[  9] local 10.10.128.6 port 61814 connected with 10.10.128.254 port 5001
[ 12] local 10.10.128.6 port 61816 connected with 10.10.128.254 port 5001
[  7] local 10.10.128.6 port 61812 connected with 10.10.128.254 port 5001
[  5] local 10.10.128.6 port 61810 connected with 10.10.128.254 port 5001
[  6] local 10.10.128.6 port 61811 connected with 10.10.128.254 port 5001
[  3] local 10.10.128.6 port 61808 connected with 10.10.128.254 port 5001
[  4] local 10.10.128.6 port 61809 connected with 10.10.128.254 port 5001
[ ID] Interval       Transfer     Bandwidth
[ 11]  0.0-20.0 sec   232 MBytes  97.5 Mbits/sec
[  5]  0.0-20.0 sec   217 MBytes  90.9 Mbits/sec
[ 13]  0.0-20.0 sec   232 MBytes  97.2 Mbits/sec
[ 12]  0.0-20.0 sec   218 MBytes  91.5 Mbits/sec
[  3]  0.0-20.0 sec   230 MBytes  96.3 Mbits/sec
[  6]  0.0-20.0 sec   230 MBytes  96.3 Mbits/sec
[  4]  0.0-20.0 sec   229 MBytes  95.9 Mbits/sec
[  9]  0.0-20.0 sec   232 MBytes  96.9 Mbits/sec
[  8]  0.0-20.1 sec   219 MBytes  91.7 Mbits/sec
[  7]  0.0-20.1 sec   219 MBytes  91.5 Mbits/sec
[SUM]  0.0-20.1 sec  2.20 GBytes   944 Mbits/sec
[  3] local 10.10.128.6 port 5001 connected with 10.10.128.254 port 42027
[  4] local 10.10.128.6 port 5001 connected with 10.10.128.254 port 42025
[  5] local 10.10.128.6 port 5001 connected with 10.10.128.254 port 42024
[  6] local 10.10.128.6 port 5001 connected with 10.10.128.254 port 42029
[  7] local 10.10.128.6 port 5001 connected with 10.10.128.254 port 42031
[  8] local 10.10.128.6 port 5001 connected with 10.10.128.254 port 42033
[  9] local 10.10.128.6 port 5001 connected with 10.10.128.254 port 42032
[ 11] local 10.10.128.6 port 5001 connected with 10.10.128.254 port 42030
[ 12] local 10.10.128.6 port 5001 connected with 10.10.128.254 port 42028
[ 13] local 10.10.128.6 port 5001 connected with 10.10.128.254 port 42026
[  4]  0.0-20.1 sec   282 MBytes   118 Mbits/sec
[  5]  0.0-20.1 sec   278 MBytes   116 Mbits/sec
[  8]  0.0-20.1 sec   286 MBytes   119 Mbits/sec
[ 13]  0.0-20.1 sec   282 MBytes   118 Mbits/sec
[  3]  0.0-20.1 sec   187 MBytes  77.7 Mbits/sec
[  7]  0.0-20.2 sec   189 MBytes  78.6 Mbits/sec
[ 12]  0.0-20.2 sec   186 MBytes  77.6 Mbits/sec
[  6]  0.0-20.2 sec   187 MBytes  77.7 Mbits/sec
[  9]  0.0-20.2 sec   189 MBytes  78.5 Mbits/sec
[ 11]  0.0-20.2 sec   189 MBytes  78.8 Mbits/sec
[SUM]  0.0-20.2 sec  2.20 GBytes   939 Mbits/sec
 

Simultaneous upload&download

If you wish to really stress your link or NIC you can try to do a simultaneous upload and download test. This will reveal weak spots and give you an idea of how upload and download together will affect your speeds. This will even get most ‘desktop’ Gigabit NIC’s on it knees because they just aren’t fast enough to handle it.

Server side

On the server we run:
iperf -s -w 1MB
  • -s    enable the server side
  • -w    TCP Window size, most often the default is 64KB which is a bit small to test actual bandwith, especially on high bandwith connections. I have found 1MB to be a good size to try and saturate links.
This should result in the following being displayed:
C:Temp>iperf -s -w 1MB
————————————————————
Server listening on TCP port 5001
TCP window size: 1.00 MByte
————————————————————

Client side

On the client we run:

iperf -c 10.10.128.254 -w 1MB -d -t 20 -P 10

  • Using the same options as above we add
  • -d      Tells the test you wish to run it in simultaneous upload & download test mode
C:temp>iperf -c 10.10.128.254 -w 1MB -d -t 20 -P 4
————————————————————
Server listening on TCP port 5001
TCP window size: 1.00 MByte
————————————————————
————————————————————
Client connecting to 10.10.128.254, TCP port 5001
TCP window size: 1.00 MByte
————————————————————
[  7] local 10.10.128.6 port 62401 connected with 10.10.128.254 port 5001
[  6] local 10.10.128.6 port 62400 connected with 10.10.128.254 port 5001
[  4] local 10.10.128.6 port 62398 connected with 10.10.128.254 port 5001
[  5] local 10.10.128.6 port 62399 connected with 10.10.128.254 port 5001
[  8] local 10.10.128.6 port 5001 connected with 10.10.128.254 port 42162
[  9] local 10.10.128.6 port 5001 connected with 10.10.128.254 port 42163
[ 10] local 10.10.128.6 port 5001 connected with 10.10.128.254 port 42165
[ 11] local 10.10.128.6 port 5001 connected with 10.10.128.254 port 42164
[ ID] Interval       Transfer     Bandwidth
[  4]  0.0-20.0 sec   529 MBytes   222 Mbits/sec
[  5]  0.0-20.0 sec   529 MBytes   222 Mbits/sec
[  7]  0.0-20.0 sec   551 MBytes   231 Mbits/sec
[  6]  0.0-20.0 sec   575 MBytes   241 Mbits/sec
[SUM]  0.0-20.0 sec  2.13 GBytes   915 Mbits/sec
[  9]  0.0-20.0 sec   524 MBytes   220 Mbits/sec
[ 10]  0.0-20.0 sec   497 MBytes   208 Mbits/sec
[  8]  0.0-20.0 sec   500 MBytes   209 Mbits/sec
[ 11]  0.0-20.0 sec   529 MBytes   222 Mbits/sec
[SUM]  0.0-20.0 sec  2.00 GBytes   859 Mbits/sec
 

Results you ‘should’ achieve

The above should give you most options you would use under normal circumstances. There are several more, like switching between TCP or UDP, but you can find those by checking the help of the application itself.

Results you should achieve, a hard subject. A lot of things can influence the results you are going to see. From network chip, to cabling, chip, drivers, switches, etc. So always try and interpret where your ‘lower’ speed is coming from. In IT, whenever something doesn’t do what you could/should expect for it, it has to have a logical reason

First we need to talk about Mbps, MB, Mbit and such. Very often I see this done wrong and to be frank, this irritates me. 😉

Mbit and Mbps mean the same. Mega (Capital M) bits per second. 1 byte is 8 bits. So let’s say we have an internet connection of 1Mbit that would mean you could achieve 1024Kbit or 1Mbit, 128KB/sec or 0,125MB/sec.

Captical M means mega, small m means micro. Be correct! “bps” stands for bits per second. So 100Mbps stands for 100 Megabit and 100MBps stands for 100 MegaBytes per second. A big difference! Most often Mbps is used for bits and to describe Bytes you use MB/sec.

Now a connection will never give you 100% of the line or wire speed. There is always overhead because of TCP and other protocols. But at all times around 92,5% should be achievable.

If we take a Gigabit Ethernet line as an example this is 1000Mbit/1000Mbps, 125MB/sec.

Okay, so what do we achieve on common connections:

1Gigabit or 1000Mbit will give you a max net result of around 945Mbit at maximum, but it should always deliver around 900Mbit. 900Mbit translates into 112,5MB/sec.
100Mbit will deliver you around 11,25MB/sec and 10Mbit around 1,125MB/sec. This is all calculates quite easily.

Hopefully that will help you figuring out what you should be achieving. If your internet provider says they will give you 60Mbit for instance, this should translate into download speeds of around 7MB/sec in real world throughput while downloading something. If you don’t, try and figure out where the bottleneck may lie (Your WiFi?) and if there is none on your side, harass them about it! 😉

One thought on “A guide to iperf (network metering)”

Leave a Reply

Your email address will not be published. Required fields are marked *