


I recently had the need to build a 2U Server for home and LAN party usage. Since AMD Ryzen is now offering a very interesting 8 core CPU with plenty of PCIe lanes I decided to use a Ryzen 1700x. The server is running Proxmox and is even using GPU passthrough! This post will host the first video and some configuration details that are harder to convey in a video. A second video and post with more information about some hardware and the GPU passthrough will go up after this.
Content Index:
This build has spawned several articles:
- This Article: about the build hardware and a ZFS storage how-to
- How to quiet the server down using different fans and PWM control
- A how-to on GPU passthrough within Proxmox for running X-split/OBS with GPU encoding and streaming to YouTube/Twitch
(I did another server build but this time in a Fractal Design Core 2300 with a Ryzen 2700, you can check it out here)
*Updates
2018-05-05 To make sure the system is stable, make sure to upgrade the Asus X370-Pro to the latest BIOS and set the option “Power Supply Option” to “Typical current idle”. This will solve stability issues during periods that the server is idle and sometimes freezes.
Build video Time-Lapse
For the build I made a Time-Lapse video which includes lots of information overlays. Make sure it watch it first!

Second video
For this second video I will go a bit deeper into certain topics concerning the server and the GPU hardware passthrough. One the others subjects is the included FAN PCB and getting the server to make a bit less noise!

Used hardware
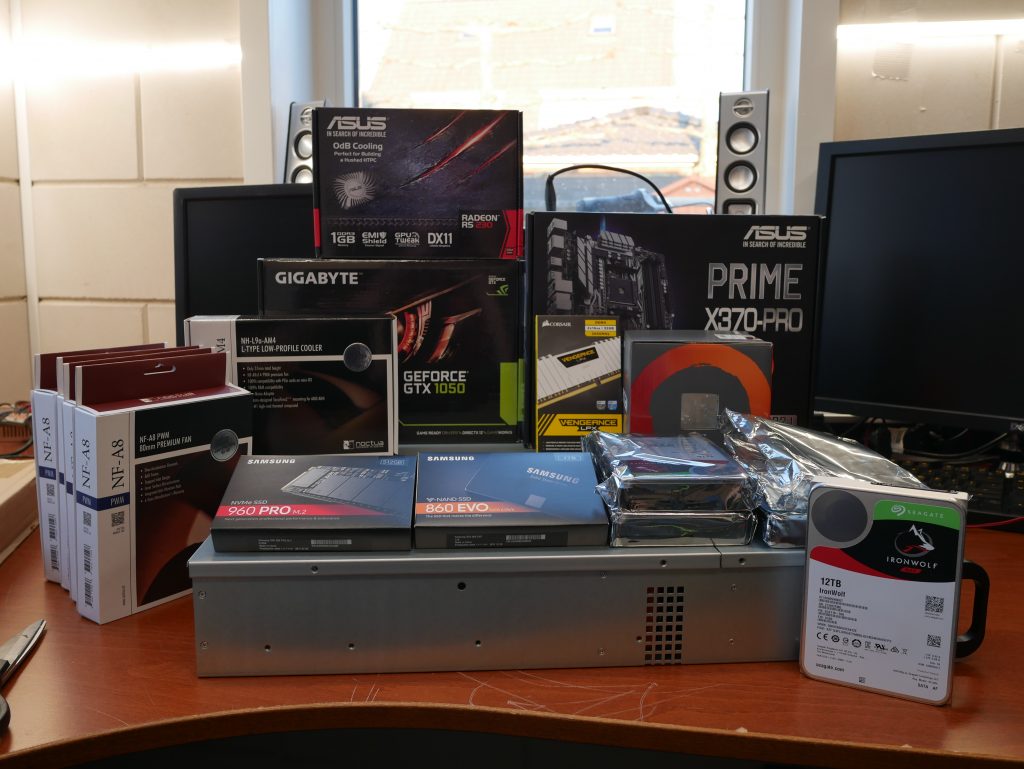

- Case: Inter-Tech IPC 2U-20255
- Case Power Supply: Inter-Tech FSP500-702UH
- Motherboard: Asus PRIME X370-Pro (Succeeded by the X470-Pro, Amazon)
- CPU: AMD Ryzen 1700x (Succeeded by the 2700(x), Amazon)
- CPU Cooler: Noctua NH-L9a-AM4 (Amazon)
- Memory: Corsair 32GB (2x16GB) 2666 CL16 (Amazon)
- Disks: 4x12TB Seagate IronWolf + 2x 2TB (Amazon)
- SSDs: 2x 1TB Samsung 860 EVO, 1x 512GB Samsung 960 Pro (Amazon 860EVO , 960PRO)
- Network: 1x1Gbit Intel Onboard + 2x1Gbit Intel i350AM + 2x10Gbit SFP+ (Amazon)
- Gigabyte GeForce GTX 1050 OC Low Profile 2G (Amazon)
- ASUS R5230-SL-1GD3-L Radeon R5 230 1GB GDDR3 (Amazon)
The 2x1Gbit Intel i350AM is a special PCIe x1 variant because all the other slots where full, you can check it out using the link. You can pick up a cheap Intel 10Gbit SFP+ card there too.
You can find the Molex to 5x SATA cable here, or a variant from SATA to 5x SATA here.
If you don’t have enough SATA data cables, pick up some of these nicely nylon sleeved ones.
Used software
The system is running on Proxmox VE 5.1. The install you saw during the video was done from a USB stick and everything works out of the box. At the time of writing it was important to enable the testing repository to get a new version kernel for the GPU passthrough.
Proxmox is a virtualization GUI around KVM and LXD/LXC running off a Debian base. It has ZFS natively integrated and offers advanced cluster functionality for running virtual machines and containers. They have a community edition you can run for free! 🙂
Some more information about configuration within Proxmox and GPU passthrough will be detailed in another post.
ZFS configuration
A lot of people asked me how I configured the ZFS pools so here is a small walkthrough. This is by no means a comprehensive guide to ZFS but mainly what I did to create the storage for this server.
Storage hardware
The board has 8xSATA-600 and 1x M.2 NVMe PCIe 3.0 x4 connectors. In this build, I’m using them all.
- 1x NVMe (PCIe 3.0 x4) Samsung 960 Pro 512GB
- 2x SATA-600 Samsung 860 EVO 1TB
- 4x SATA-600 Seagate Ironwolf 12TB
- 2x SATA-600 Seagate 2TB
The only expansion option that is left is replacing the 2x2TB drives with another pair of 12TB drives if needed in the future.
ZFS configuration
The ZFS configuration only consists of mirrors.
Fixing the Proxmox Boot/VM/Container mirror
During the installer I opted to use the 2x 1TB SSD’s on a mirror. This should provide plenty of performance and security in the case of a hardware failure.
Out of the box, the proxmox installer creates these using drive links such as /dev/sdb, /dev/sdc, etc.. I don’t really like that approach and much rather use /dev/disk/by-id links since when a change occurs in controllers, drive order or even hosts that won’t ever change.
So the first thing to do is fix this.
I did that using the following commands, I’ll illustrate with screenshots:
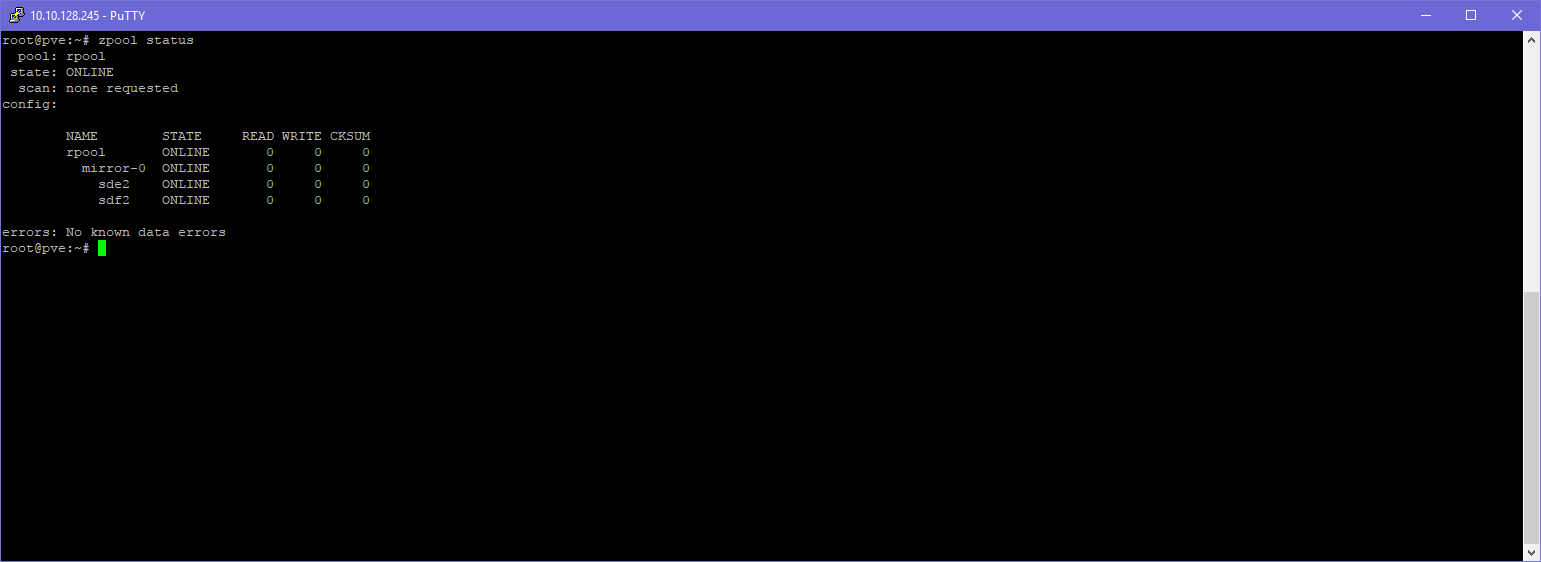
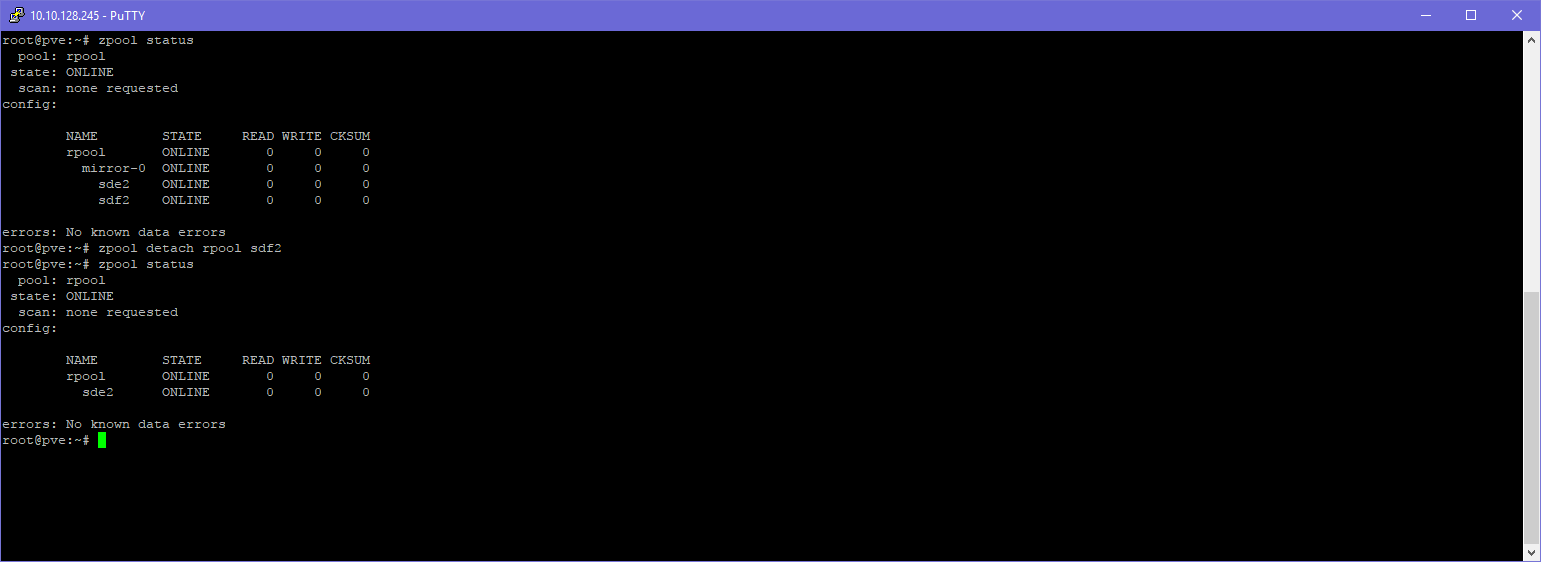


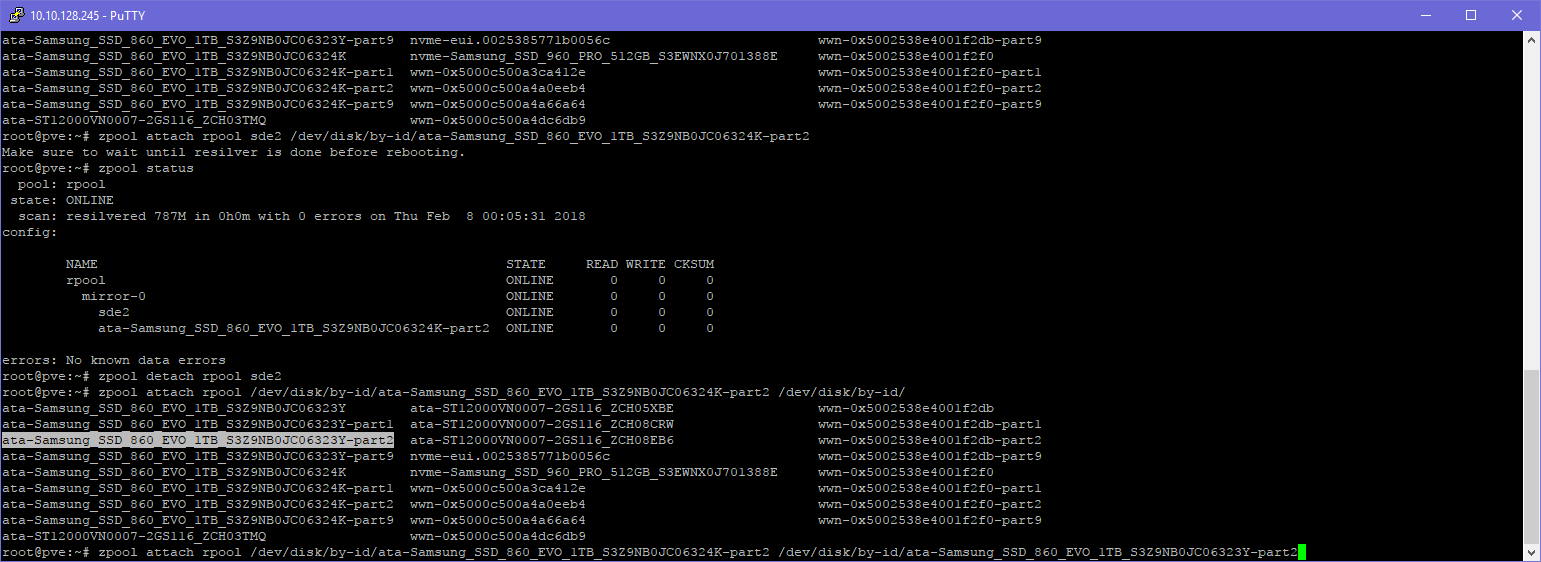

And with that you are using (in my opinion) the correct way to connect your disks in ZFS! Now, even when you change drive order, controller or even hosts, it should be able to find all the disks.
Creating the 4x12TB Pool
For mass data storage I decided to use the 4x12TB in one pool with two mirrors. That makes the most amount of sense with this disk configuration. Why?
- RAIDz1 would give me more space but random I/O performance of one disk. Rebuilding with this amount of data is sketchy at best, so avoid
- RAIDz2 would give me the same amount of space as mirrors but random I/O performance of one disk. Sequential and redundancy should be fine
- 2 Mirrors in one pool gives me the random I/O of two disks and still great sequential performance and redundancy. It also doesn’t need any parity calculations so save on CPU usage
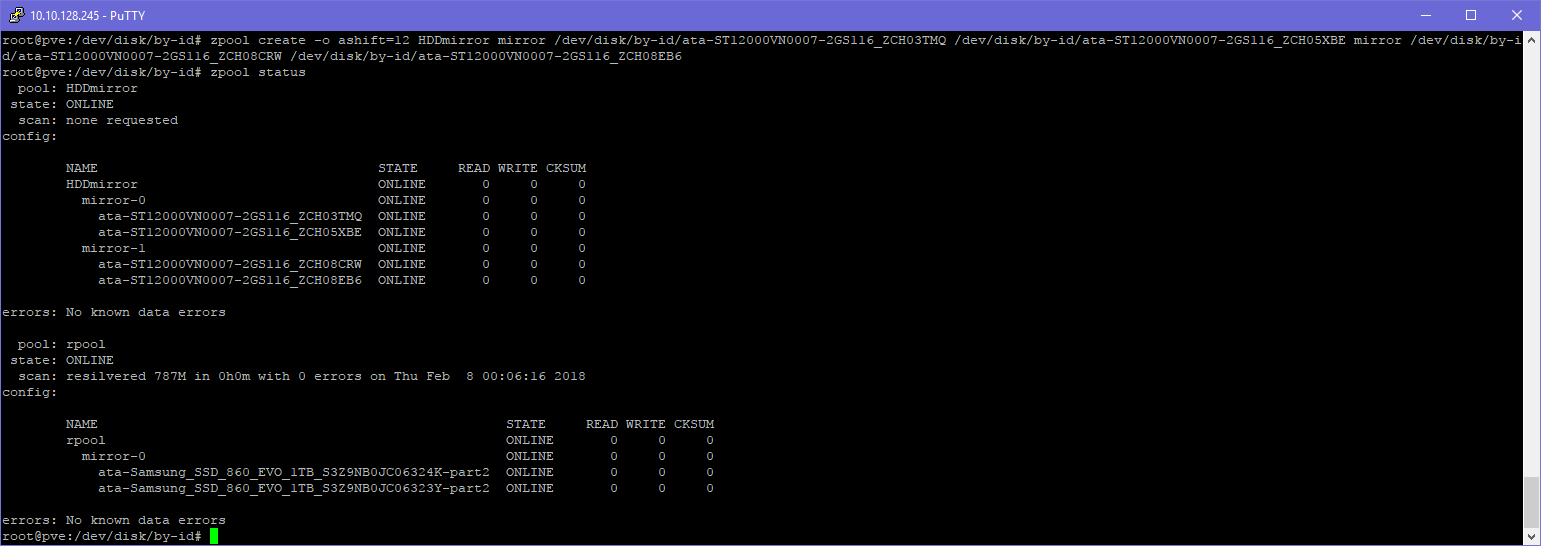
The way to configure this is the following:
zpool create -o ashift=12 hddmirror mirror /dev/disk/by-id/disk /dev/disk/by-id/disk mirror /dev/disk/by-id/disk /dev/disk/by-id/disk
Setting compression
After creating the pool I advise to enable LZ4 compression. It works wonders on modern hardware, hardly costing any CPU and saving precious space where possible! Even when incompressible files are written it has a mechanism which gives up on compressing those files. It also changes how ZFS access the disk making things a bit more efficient in most cases.
zfs set compression=lz4 hddmirror
And that’s the pool done!
Creating the 2x2TB Pool
The 2x2TB disks where added in the same way to a different pool. Although ZFS can handle different disk sizes as mirrors within the same pool I am going to use the disks for different purposes and wanted to seperate the I/O.
Add Cache (L2ARC) and/or write “cache” (ZIL/SLOG)
Why the need for cache?
I added the Samsung 960 PRO to use as a L2ARC for the server. During LAN parties a video team will be dumping footage and then use those files directly from several PC’s to edit videos. This requires quite a bit of speed to make it work fluently for everyone at the same time.
In part, this is why I added the 10 Gigabit network cards. But with “only” 4x12TB disks which do about 200MB/sec on average that would only give me 400MB/sec on writes and 400 to 600MB/sec on reads maximum. Although those numbers aren’t bad, those are for pure sequential transfers, if multiple people are hitting the pool at the same time, you won’t reach those numbers.
Adding L2ARC can alleviate some of the load on the disks. It will provide another source where it can get the blocks you are requesting.
CONS: Yes, adding L2ARC will cost you some memory from ARC (the in-memory cache) but in my case I believe that trade off to be the correct one
Why the Samsung 960 PRO and using it for multiple pools
I chose the Samsung 960 PRO because of its performance using a single queue depth and because it uses MLC memory instead of TLC so can handle writes and endurance a bit better.
Because this SSD is connected using PCIe 3.0 x4 it has about 4000MB/sec of bandwith and the specs of this SSD say it can deliver about 3500MB/sec read and 2100MB/sec write. Now it won’t do that during L2ARC/SLOG duty but I’m hoping it will come closer to saturating the 10Gbit or providing more I/O in conjunction with the disks then just the disks alone.
Cons:
- It’s no Enterprise SSD so it doesn’t have a giant endurance but still a lot better then any generic SSD.
- It lacks any form of power protection. So using it as an ZIL/SLOG device is debatable.
If you are a ZFS purist, this device cannot be used as an ZIL/SLOG device. In my opinion, unless you go the whole route with ECC memory, a UPS and/or disable disk write caches, etc. not having power loss protection on your SSD will be the last of your problems. But, decide for yourself how important the last few seconds of data are for you!
Nevertheless, I have appointed some space on the SSD so I can play around with an ZIL/SLOG. Therefor I’m using the following partitions on it.
Total Size: 512GB
- 10GB Potential ZIL for 12TB HDDs
- 10GB Potential ZIL for 2TB HDDs
- 300GB L2ARC for 12TB HDDs
- 100GB L2ARC for 2TB HDDs
-50GB overprovision
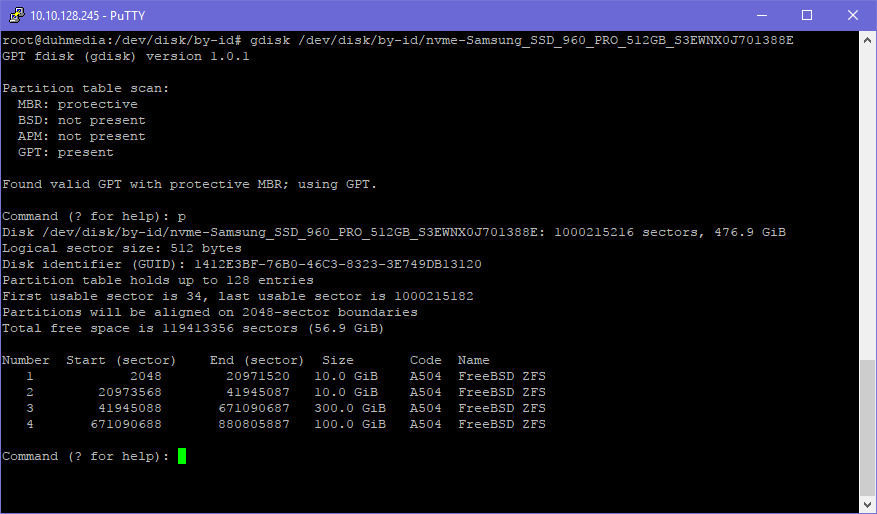
Creating the partitions for L2ARC/ZIL
To create the partitions I use a tool called “gdisk”, using the following line:
gdisk /dev/disk/by-id/nvme-Samsung_SSD_960_PRO_512GB_S3EWNX0J701388E
To create the first partition hit
n, 1, +10G, A504
Continue those commands to create all the partitions. After that you should see something like the following:
Adding a Cache to a pool
To add a cache to a pool you run the following command:
zpool add hddmirror cache /dev/disk/by-id/nvme-Samsung_SSD_960_PRO_512GB_S3EWNX0J701388E-part3
root@duhmedia:/etc/modprobe.d# zpool status
  pool: hddmirror
 state: ONLINE
  scan: scrub repaired 0B in 0h0m with 0 errors on Sun Feb 11 00:24:43 2018
config:

        NAME
        hddmirror
          mirror-0
            ata-ST12000VN0007-2GS116_ZCH03TMQ
            ata-ST12000VN0007-2GS116_ZCH05XBE
          mirror-1
            ata-ST12000VN0007-2GS116_ZCH08CRW
            ata-ST12000VN0007-2GS116_ZCH08EB6
         cache
          nvme-Samsung_SSD_960_PRO_512GB_S3EWNX0J701388E-part3
Adding a ZIL/SLOG to a pool
To add a ZIL/SLOG (see warnings above!) to a pool, run the following command:
zpool add hddmirror log /dev/disk/by-id/nvme-Samsung_SSD_960_PRO_512GB_S3EWNX0J701388E-part1
root@duhmedia:/etc/modprobe.d# zpool status
  pool: hddmirror
 state: ONLINE
  scan: scrub repaired 0B in 0h0m with 0 errors on Sun Feb 11 00:24:43 2018
config:

        NAME
        hddmirror
          mirror-0
            ata-ST12000VN0007-2GS116_ZCH03TMQ
            ata-ST12000VN0007-2GS116_ZCH05XBE
          mirror-1
            ata-ST12000VN0007-2GS116_ZCH08CRW
            ata-ST12000VN0007-2GS116_ZCH08EB6
        logs
          nvme-Samsung_SSD_960_PRO_512GB_S3EWNX0J701388E-part1
        cache
          nvme-Samsung_SSD_960_PRO_512GB_S3EWNX0J701388E-part3
Raising L2ARC fill rate
Because I want the cache to have parts of most of the current media files on it, I raised the L2ARC fill rate setting. Normally this setting is set conservatively to only cache much used blocks over a long period of time and not sequential files so the SSD won’t be trashed too much with writes.
If you should change this setting and if it will be beneficial for you really depends on your usage, so use it with caution! It will cause a lot more writes on your SSD and might not give you better performance!
To change these values you need to create a new file in /etc/modprobe.d. You can use the following commands:
echo options zfs l2arc_noprefetch=0 > /etc/modprobe.d/zfs.conf
echo options zfs l2arc_write_max=524288000 >> /etc/modprobe.d/zfs.conf
echo options zfs l2arc_write_boost=524288000 >> /etc/modprobe.d/zfs.conf
After this you need to perform a:
update-initramfs -u
to make sure the values get loaded during booting. When that’s done, reboot the system. You can check the new values in the files located in: /sys/module/zfs/parameters
This sets the L2ARC to a max write speed of 500MB/sec and to cache everything from single blocks to sequential reads.
Again, I can’t warn enough about this, these settings might be completely wrong for your installation and use case and might actually make performance worse and kill your SSD sooner, use with caution, do your own research!
End of this part
As written above, I’m going to make a second blog post talking a bit more about Proxmox and using GPU passthrough together with a video showing some hardware features and how to make this server quieter then it comes out of the box.
If you have any questions or comments, let me know down below!